Writing sensory-motor loops in ROS
Today
- Writing our first sensory-motor loops (in groups)
For Next Time
- Work on the
the Warmup Project . There is an intermediate checkpoint due on Tuesday (class meeting 4).
Sensory Motor Loops
One way to think of the intelligence that drives a robot is as a sensory-motor loop.
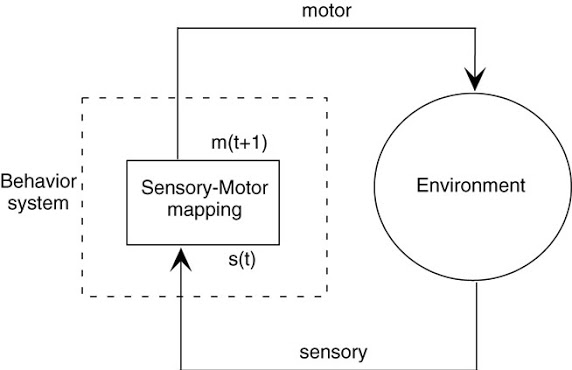
Today, we will be building on the basic ROS nodes we wrote last time to create a ROS node that both integrates sensory data (through subscribing to a topic) and outputs a motor command (by publishing to a topic).
Creating our First Sensory Motor Loop
Sample solutions to this can be found in the
class_activities_and_resourcesGithub repository underin_class_day_03_solutions.
Find another person in the class to work with. If you’re paired up for the warmup project, consider working with that person. In pairs, you will begin to explore the idea of a sensory-motor loop on the Neatos.
In order to get started, create a package for the code that you will be writing today. As with all ROS packages in your workspace, it must be inside of your ros2_ws/src folder. Besides this requirement, you are free to put the package anywhere.
$ cd ~/ros2_ws/src
$ ros2 pkg create in_class_day03 --build-type ament_python --node-name emergency_stop --dependencies rclpy std_msgs geometry_msgs sensor_msgs neato2_interfaces
The first sensory-motor loop we will create is one in which the robot moves forward at a fixed speed until it senses an obstacle (using the bump sensor) and then stops. For a rundown of the bump sensors on the Neato, check out the
Hints:
- You will need some way to share data between the callback functions that process the Neato’s sensory data and your main robot program. Assuming you are using classes to define your ROS nodes, you can create a class attribute to share this data between class methods..
If you execute the ros2 pkg create command given above, there should already be a file called emergency_stop.py created for you. If you placed your package in ros2_ws/src it will be located at: ~/ros2_ws/src/in_class_day03/in_class_day03/emergency_stop.py.
Using the Laser Range Finder
The next sensory-motor loop I suggest that you create should be called distance_emergency_stop.py. In order to add this node, you will have to modify the setup.py file in your in_class_day03 package.
The distance_emergency_stop.py node should be identical to emergency_stop.py except it should use the laser range finder to detect when an obstacle is within a specified distance and stop if this is the case. It is up to you how you implement this. You can either use just the measurements in front of the robot, or perhaps use all of the measurements. You may want to use an all-or-nothing control strategy (also called bang-bang) where you are either going ahead at some fixed speed or you stop completely. Alternatively, you may use something akin to proportional control where your speed slows proportionally with how close you are to the target distance. Again, for more detail on using the Neato sensors (including the laser range finder), see the
Once you implement this, you may consider using the command line tool rqt to add a visualization of the laser scan data. This plot shows scan/ranges[0] (the measurement straight ahead). For my implementation I used 0.5m as my target distance.
![A plot that shows /scan/ranges[0] converging to the value of 0.5](../website_graphics/rqt_laser_range.png)